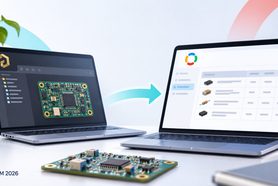
The board is ready for a prototype build, so you export the BOM from Altium to Excel and send it to purchasing. The buyer adds cost and vendor for each part, checks the manufacturer part numbers on DigiKey and places the order. Two weeks later you swap three capacitors, export again, and the buyer starts over: a new spreadsheet, with the old prices copied back in row by row.
An Altium BOM export is a good snapshot of the design, and Excel is still how many teams hand it off. The work piles up when the design data and the purchasing data live in separate files that someone has to reconcile after every change.
At OpenBOM, we keep both in one place. The OpenBOM add-in for Altium Designer creates the BOM from your project and puts each part in a catalog as an item, so the cost and vendor your buyer adds stay with the part. You set the add-in up once, then create the BOM with a right-click.
How do you create a BOM from Altium Designer?
In Altium Designer, you can export a bill of materials to Excel from the Reports menu, or create it directly in OpenBOM with the OpenBOM add-in. Set the add-in up once in OpenBOM > Settings: choose your part number parameter, map component properties and pick a default catalog. Then right-click the project and select OpenBOM > Create/Update BOM.
Each setting decides where a piece of component data ends up:
| Setting in Altium | Example for the board | Where it goes in OpenBOM |
|---|---|---|
| Component Parameter to use as Part Number | Part Number | The part number of each item and BOM row |
| Properties | Description, Manufacturer, Manufacturer Part Number, Item ID | The item in the catalog |
| BOM Properties | Designator | The BOM row for this board |
| Default Catalog | Quickstart | The catalog that holds the parts |
| Added automatically | Part Number, Quantity, Thumbnail | No mapping needed |
The split follows how a part is used. A 0.1 µF TDK capacitor has one description and one manufacturer part number wherever it appears, so those belong to the item. Its 19 designators belong to this board, so they belong to the BOM.
This article follows an illustrative board, part number 7009001, built in a variant called FIXED 5V.
Open the settings and choose your part number
Everything the add-in needs is in one dialog.
In Altium Designer, right-click your project and select OpenBOM > Settings. If you have not installed the add-in yet, start with the OpenBOM add-in for Altium Designer.

In Component Parameter to use as Part Number, select the Altium parameter that holds your part numbers. For the board, that is Part Number. The list shows the parameters in the active document. The part number is how OpenBOM recognizes each part, so it is also what connects the BOM to parts that purchasing may already have in a catalog.
Map component properties to the catalog item
Next, decide which component data imported with each part.
Next to Properties, select New and give the mapping a name, for example Altium Properties. Move the properties you want from CAD properties to OpenBOM properties. For the board, that is Description, Manufacturer, Manufacturer Part Number and Item ID. The list is long, so type the first letter of a property to jump to it, and use Up and Down to set the order. Select Save. Part Number, Quantity and Thumbnail are always added, so you do not need to map them.
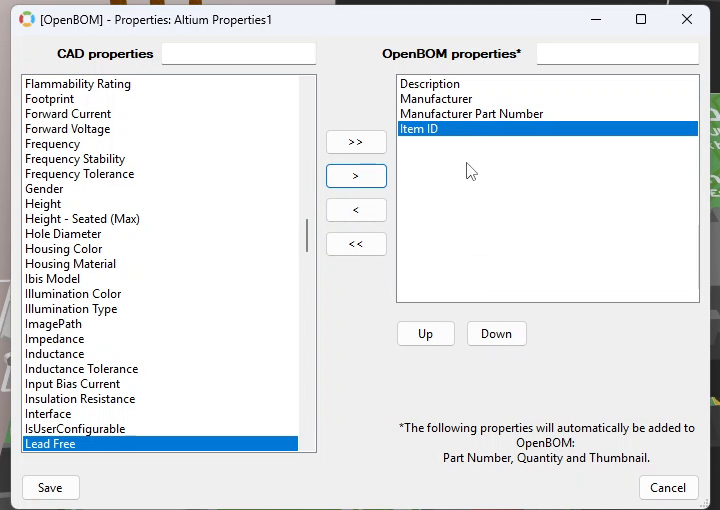
To start without mapping, tick Use Altium Bill Of Materials settings in the settings dialog instead. OpenBOM then uses your Altium bill of materials setup.
Add designators to the BOM and pick a catalog
Some data belongs to the part, and some belongs to the board.
Open Advanced Property Settings. Next to BOM Properties, select New, add Designator and save. Designator now goes into the BOM rows, while Description, Manufacturer and the other mapped properties go to the items in the catalog.

In Default Catalog, choose the catalog for the parts. If you use a single catalog, Quickstart works. Select OK.
Before you create the first BOM, agree as a team which properties Altium controls (the ones you just mapped) and which ones you maintain in OpenBOM, like cost and vendor. Everyone then knows where to make a change.
Create the BOM from the project
With the settings saved, the BOM is one command away.
Right-click the project and select OpenBOM > Create/Update BOM. A summary shows the part number, the variant and the catalog: for the board, 7009001, FIXED 5V and Quickstart. Check them, then select Create BOM.

Check the BOM and the catalog items
When it is done, open the BOM in OpenBOM.
Each row has its part number, quantity, designators, description, manufacturer and manufacturer part number. The 0.1 µF TDK capacitor is one row with a quantity of 19 and all of its designators, from C4 onward.

The parts also appear as items in the catalog. Purchasing had imported the same part numbers from their spreadsheet earlier, so OpenBOM merged them: the cost and the DigiKey vendor were already on the items, and they show in the BOM next to the data from Altium. The buyer works from this BOM instead of a fresh export.
Why is an Altium parameter missing from the OpenBOM property list?
The OpenBOM property lists show the parameters of the active document in Altium Designer. If a parameter you expect, such as Manufacturer Part Number, is missing, the active document probably does not have it. Open a document whose components carry that parameter, or add the parameter to the components, then open OpenBOM > Settings again.
The same rule applies to the part number. If the parameter that holds your part numbers is not in the Component Parameter to use as Part Number list, check the active document first.
A checklist for your next Altium project
- Open the settings. Right-click the project and select OpenBOM > Settings.
- Choose the part number. Select the parameter in Component Parameter to use as Part Number.
- Map item properties. Create a Properties mapping with Description, Manufacturer, Manufacturer Part Number and anything else that belongs to the part.
- Map BOM properties. Add Designator under Advanced Property Settings.
- Pick the catalog. Choose a Default Catalog and select OK.
- Create the BOM. Select OpenBOM > Create/Update BOM, check the part number, variant and catalog in the summary, then select Create BOM.
The setup happens once. After that, the board’s BOM is a right-click away, the parts sit in the catalog with the data purchasing added, and nobody rebuilds a spreadsheet to get there. The next step in the series covers Altium 365 projects and libraries, including BOMs built from released Altium 365 project versions.
Start an OpenBOM free trial to explore the Altium add-in and catalogs with your own PCB designs.
Join our newsletter to receive a weekly portion of news, articles, and tips about OpenBOM and our community.