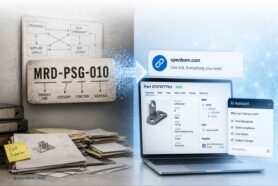
Welcome to the OpenBOM June 2026 update!
Every OpenBOM release is shaped by a simple goal: to make it easier for engineering and manufacturing teams to manage product data, connect their tools, and complete everyday work with fewer manual steps. The June 2026 update continues in that direction with improvements across subscription management, BOM workflows, property organization, ERP integrations, and connected CAD and File Manager workflows.
This month, we are introducing several improvements directly in OpenBOM. Teams registered in 2026 can now expand an existing subscription from the Billing page. The Property Order panel makes it easier to find and organize properties in large documents, while the improved Copy BOM dialog reduces repetitive data entry by automatically using information from the source Item. We also extended the Items Dashboard deletion workflow, giving users a clearer and safer way to review, remove, and restore Items together with their associated BOMs.
A major focus of this release is reducing manual work across connected engineering systems. ERP exports now provide a cleaner interface, clearer progress feedback, improved reporting, and more reliable synchronization across supported integrations. Autodesk Fusion users can now include Sheet Metal properties in OpenBOM BOMs, while PTC Onshape users can monitor file uploads directly from the browser integration.
We also delivered several important improvements for OpenBOM for SOLIDWORKS and File Manager. The Generate Part Number and Save Item workflows now require fewer steps, consolidate settings and warnings, and make it possible to generate Part Numbers and save selected Items within a more streamlined process. File Manager can now automatically detect related drawing files during Smart Sync and provides more flexible Lock and Unlock options for selected Items, parent Items, and complete assembly structures.
Alongside these visible changes, this release includes important refinements to revision updates, Excel and ZIP exports, inventory history, currency display, CAD thumbnails, and Visma validation. Together, these improvements are designed to make OpenBOM more predictable, easier to navigate, and better aligned with the daily workflows of engineering, manufacturing, procurement, and operations teams.
In the sections below, I’ll walk through what is new in the June 2026 release and explain how these updates can help your team work more efficiently.
Add Licenses to an Existing Subscription
Teams registered in 2026 can now expand an active OpenBOM subscription directly from the Billing page.
Team Owners can add more core licenses, CAD add-ons, and ERP, upgrade from Team to Company licenses, or change the team’s records tier without creating a separate subscription. OpenBOM shows the amount due for the current billing period before the purchase is confirmed, while keeping the existing renewal date unchanged.
Newly purchased licenses are added to the current license pool and appear as Unassigned, ready for an owner to assign to team members. When upgrading from Team to Company, existing assigned users are automatically moved to the corresponding Company licenses.
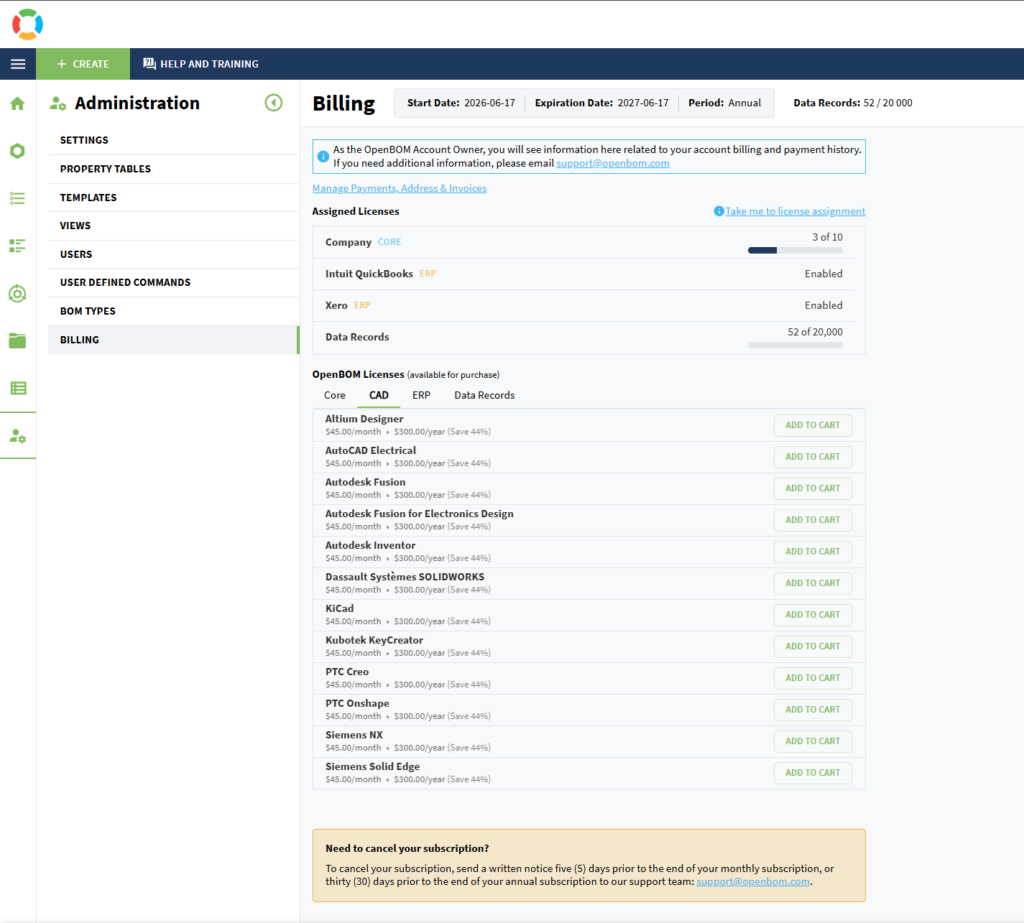
How It Works
- Sign in as the Team Owner.
- Go to Administration → Billing.
- Choose the additional licenses, add-ons, or records tier that your team requires.
- Review the amount due now and the updated renewal total.
- Confirm the purchase and complete payment when required.
- Return to Billing to view the updated license quantities.
- Assign the newly added licenses to team members.
Note: This capability is currently available for teams registered in 2026.
Search and Reorder Column Properties Faster
You can now search for properties directly in the Property Order panel, making it easier to manage documents with long property lists.
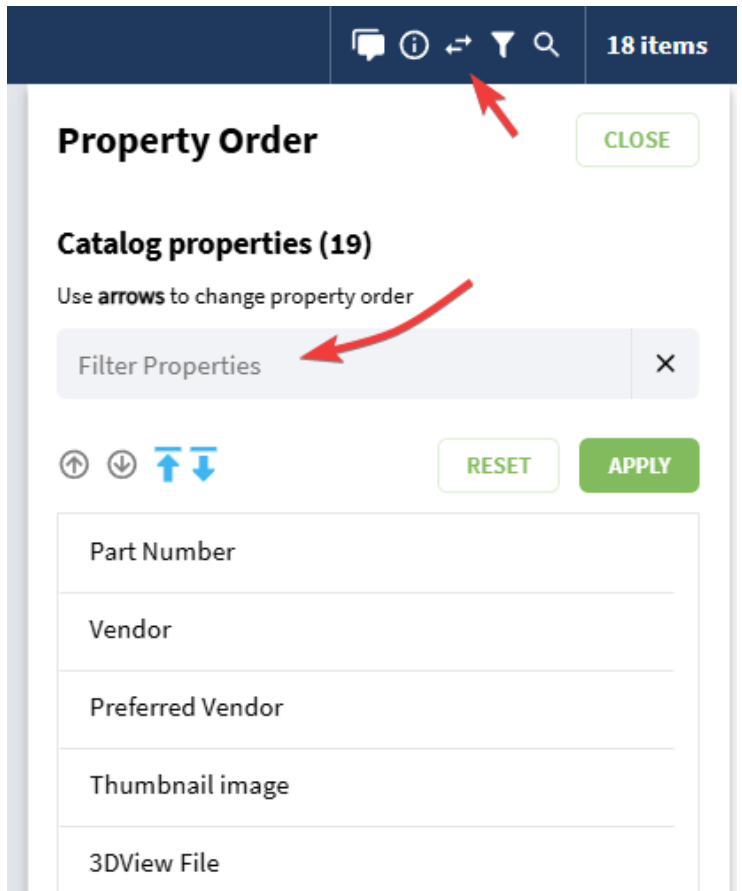
Begin typing a property name to filter the list and quickly locate the property you need. From the filtered results, you can move the selected property directly to the top or bottom of the full property list without clearing the search first.
If you select a property and then clear the search using the X icon or by removing the entered text, the property remains selected. You can then use Move Up or Move Down to adjust its position in the full list, one step at a time.
This improvement reduces scrolling and makes property organization faster and more predictable when working with large BOMs, catalogs, and other data records.
How It Works
- Open the Property Order panel.
- Enter the property name in the search field.
- Select the property from the filtered results.
- Move it directly to the top or bottom of the list, or clear the search while keeping the property selected.
- Use Move Up or Move Down to adjust its position in the full list.
- Review the updated property order.
Note: Move Up and Move Down are unavailable while the property list is filtered. Clear the search to use single-step movement.
Copy BOM Dialog is Greatly Improved
You asked…. We Listened!
The Copy BOM dialog now automatically fills in key information from the item associated with the source BOM, reducing manual entry and speeding up the creation of a new BOM based on an existing one.
When the dialog opens, OpenBOM will prepopulate the Catalog, Part Number, BOM Type, and BOM Name. A direct link to the source Catalog is also available, allowing you to open the Catalog and immediately locate the related item.
All prepopulated values remain editable, so you can adjust them before creating the copied BOM.

How It Works
- Open the BOM you want to copy.
- Select Copy BOM.
- Review the prepopulated Catalog, Part Number, BOM Type, and BOM Name.
- Use the Catalog link to open the related Catalog item, if needed.
- Update any values you want to change.
- Create the new BOM copy.
Note: If the source item cannot be found in the catalogs or you do not have access to it, the fields will remain empty.
Delete Items and Associated BOMs from the Items Dashboard
You can now remove an Item and its associated BOMs directly from the Items Dashboard using a guided deletion flow.
When the selected Item is used in one or more BOMs, OpenBOM displays a confirmation dialog listing the affected BOMs. Each BOM is linked in the message, allowing you to review it before deletion. A search field is also available to help filter longer BOM lists.
If the Item has no associated BOMs, it is removed immediately without opening the BOM confirmation dialog.
OpenBOM respects existing access permissions throughout the process. Only BOMs you are allowed to edit can be deleted. If you do not have the required access, neither the protected BOMs nor the Item will be removed.
After a successful deletion, OpenBOM displays a report showing which BOMs were deleted and provides a restore link in case the action needs to be undone.


How It Works
- Open the Dashboard.
- Select the Item you want to remove.
- Use Remove Item from the context menu.
- If associated BOMs exist, review them in the deletion dialog.
- Use the search feature to find a specific BOM when needed.
- Open any BOM link to review it before deletion.
- Click Delete to remove the Item and the BOMs you have permission to edit.
- Review the deletion report or use the restore link to undo the action.
Note: Cancel closes the dialog without deleting the Item or any associated BOMs.
Improved ERP Export Experience
OpenBOM ERP integrations now provide a cleaner and more consistent experience when sending items and BOMs to connected ERP systems.
The Send Item to ERP interface has been redesigned to make the export process easier to understand and use. Updated loading indicators now provide clearer feedback during export processing, and the selected Part Number is displayed in the ERP window title to help identify the item currently being handled.
The ERP Export Report has also been improved with search and sorting. You can quickly find specific items, review previous export results, and more easily identify records that require attention. When no matching results are found, the report now displays a clear empty state instead of an empty table.
The initial QuickBooks export workflow has also been simplified, reducing the number of steps required to begin sending product data.
How It Works
- Open an available ERP integration.
- Select an Item or BOM to export.
- Review the Item information in the updated export interface.
- Start the export and follow its progress using the updated loading indicators.
- Open the ERP Export Report after the export is complete.
- Use search and sorting to find and review specific export results.
Additional Improvements
- Property mappings now remain clear when a previously mapped OpenBOM property is no longer available.
- ERP reports now display complete source and result information after successful Item exports.
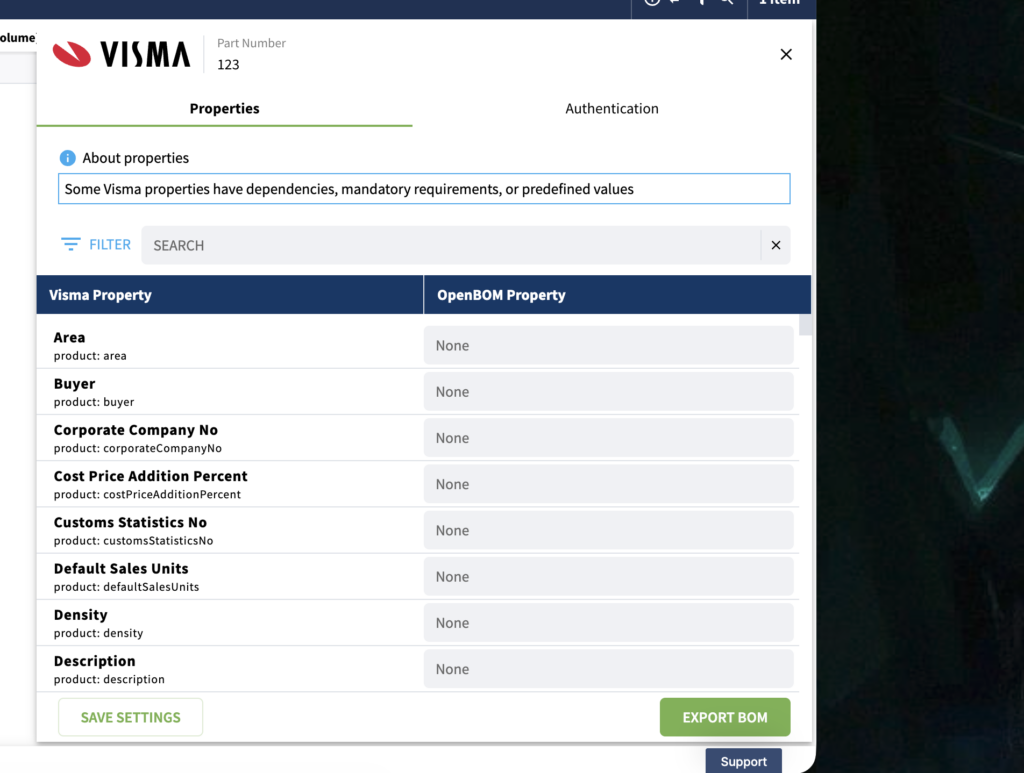
- Improved BOM export reliability across Katana, Priority, Zoho, Aras, Odoo, and Visma.
- Fixed an issue that could prevent customers from configuring the Odoo integration.
- Improved confirmation messages displayed after successful Odoo exports.
Sheetmetal properties in OpenBOM for Autodesk Fusion
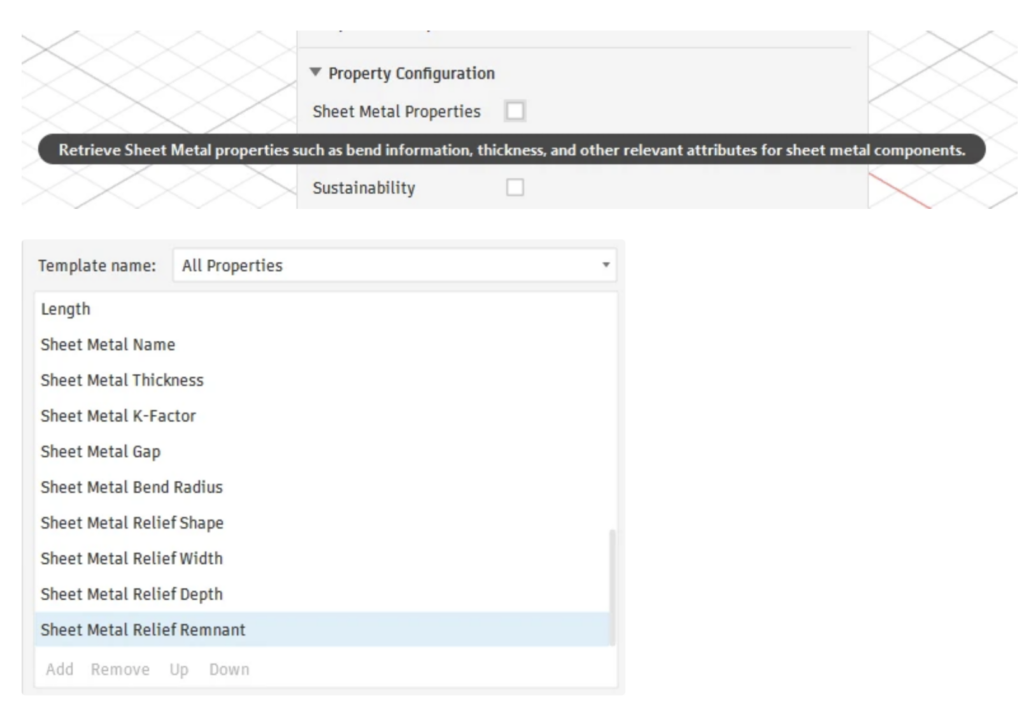
The Autodesk Fusion plug-in now supports exporting Sheet Metal properties directly into OpenBOM. When the “Include Sheetmetal Properties” option is enabled, properties such as thickness, bend conditions, and K-Factor are automatically included in the BOM, giving shop teams accurate sheet metal cut and bend information without manual input.
How It Works
- Open the OpenBOM for Autodesk Fusion plug-in settings from the ribbon menu.
- Navigate to the Property Configuration section.
- Check the Sheet Metal Properties checkbox to enable it. (Hovering over it shows a tooltip: “Retrieve Sheet Metal properties such as bend information, thickness, and other relevant attributes for sheet metal components.”)
- Select your Template (e.g., “All Properties”) to see the available Sheet Metal properties.
- From the properties list, add the ones you need — available options include: Sheet Metal Name, Thickness, K-Factor, Gap, Bend Radius, Relief Shape, Relief Width, Relief Depth, and Relief Remnant.
- Use Add / Remove / Up / Down buttons to manage and reorder the selected properties.
- Run the BOM extraction — the Sheet Metal properties will now be included in your OpenBOM BOM.
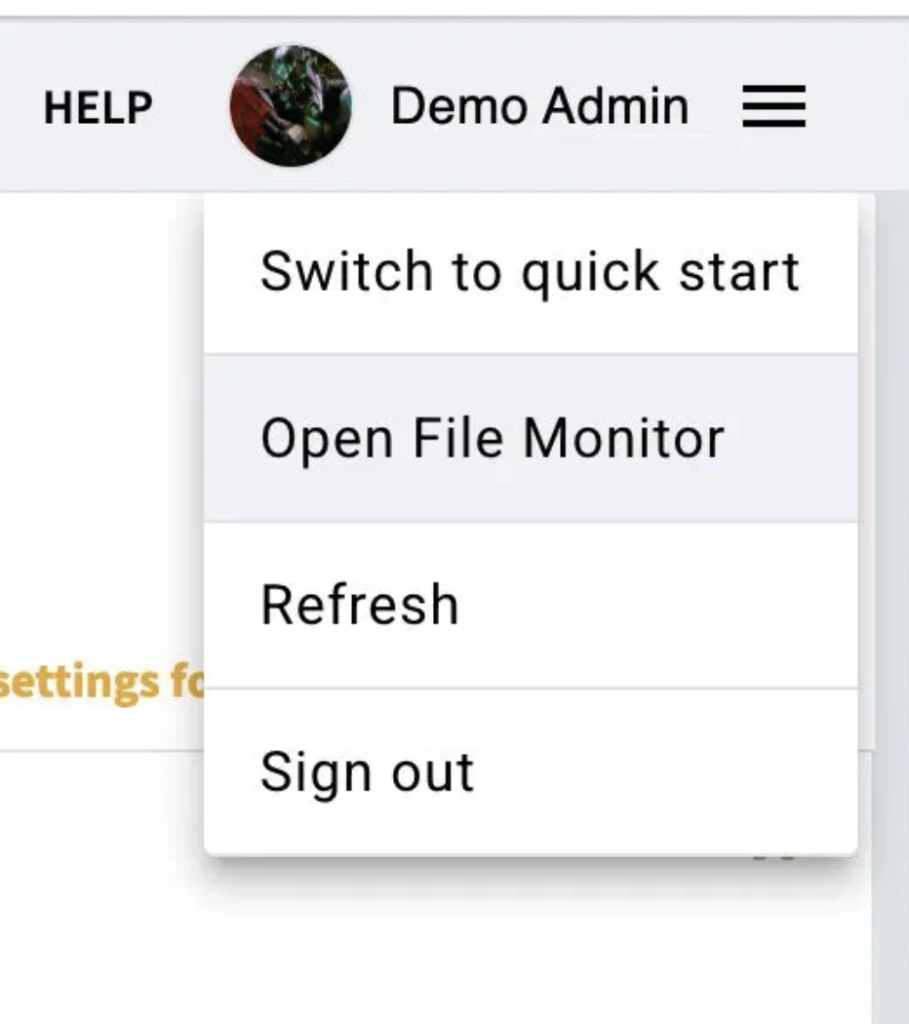
File Monitor in PTC Onshape
The File Upload Status panel, previously available only in the desktop CAD integrations, is now accessible directly in the PTC Onshape browser integration. Users can monitor upload progress, view uploaded files with their workflow status and date, and refresh the data at any time — all without leaving the browser. The panel is accessible via the hamburger menu and the preview dialog.

How It Works
- Export your BOM or files from the PTC Onshape integration as usual.
- Click the hamburger menu (☰) in the top-right corner of the OpenBOM panel.
- Select “Open File Monitor” from the dropdown.
- The PTC Onshape File Upload Status page will open, displaying a table of all uploaded files, including Part Number, File Type, File Name, Workflow Status, Details, Storage Type, Export Rules, Smart Sync, and Last Update.
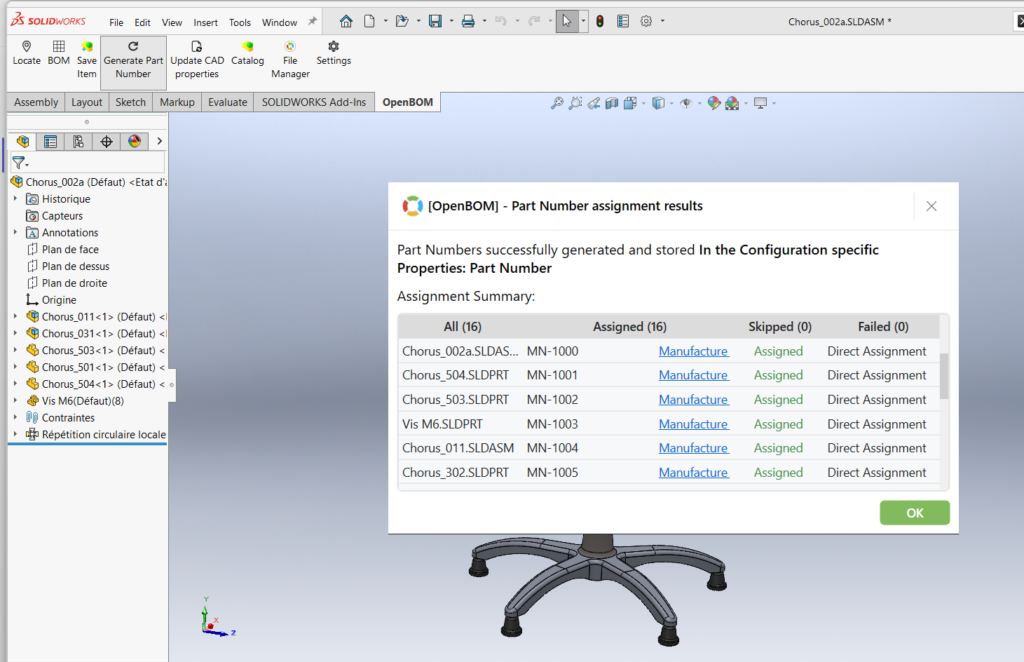
Redesigned Generate Part Number Dialog in OpenBOM for SOLIDWORKS Reduces Clicks and Consolidate Warnings
The Generate Part Number dialog in the SOLIDWORKS OpenBOM add-in has been redesigned to reduce the number of clicks required during part number generation. Previously, users had to confirm multiple warning pop-ups before completing the operation. Now, all relevant warnings and settings are consolidated into a single dialog, so clicking “Generate Part Numbers” serves as the confirmation step. After generation, a new Part Number Assignment Results summary is displayed, showing the total count of assigned, skipped, and failed items — giving users immediate visibility into the outcome without additional dialogs.
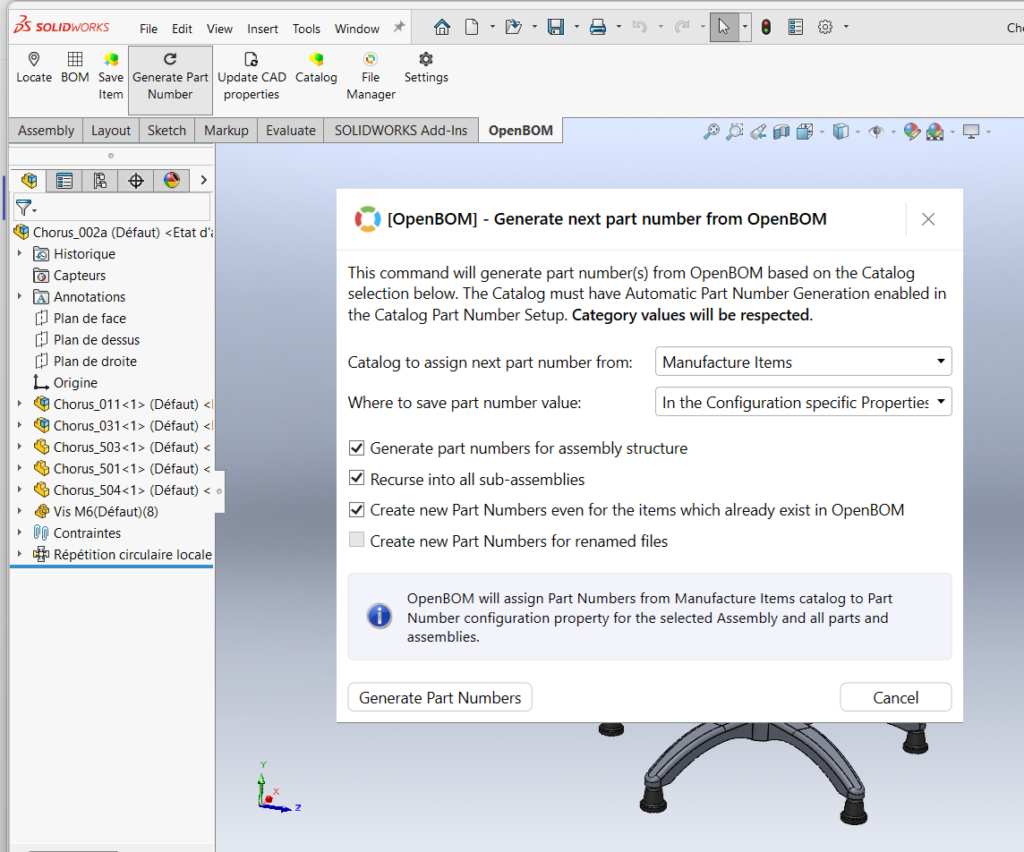
How It Works
- Click the Generate Part Number button in the OpenBOM ribbon inside SOLIDWORKS.
- In the dialog, configure the settings:
- Select the Catalog to assign part numbers from.
- Choose where to save the part number value (e.g., Configuration-specific Properties).
- Toggle options: generate for assembly structure, recurse into sub-assemblies, create new PNs for existing items, or for renamed files.
- Click Generate Part Numbers — this now acts as the single confirmation step (no additional warning pop-ups).
- Review the Part Number assignment results summary showing: All, Assigned, Skipped, and Failed counts per file.
- Click OK to close.
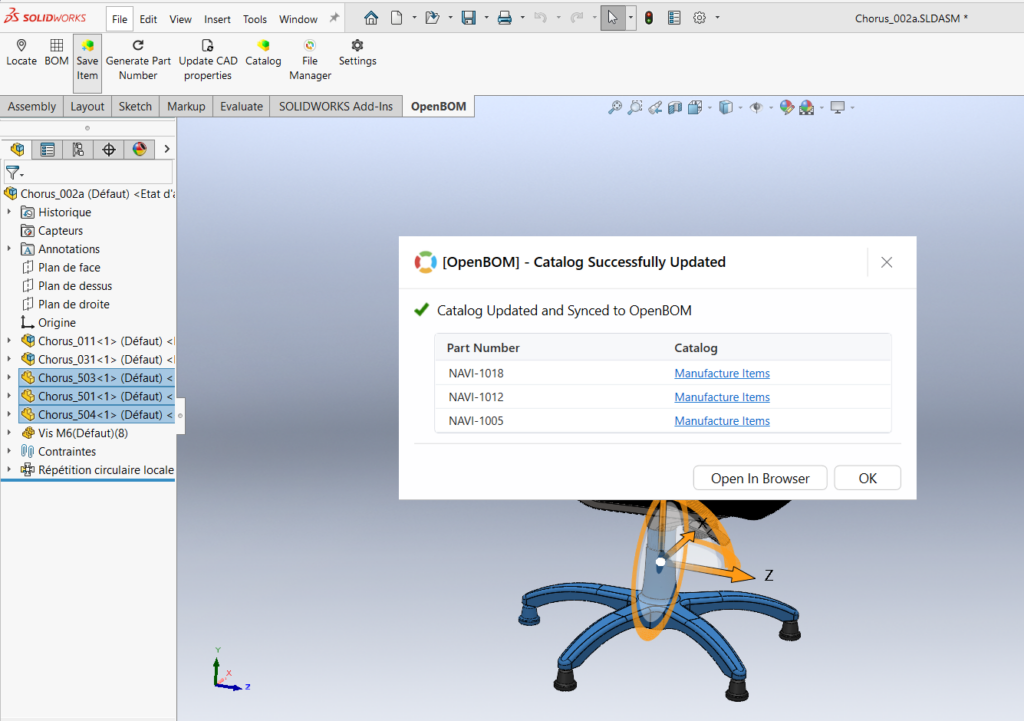
Redesigned Save Item Dialog in SolidWorks OpenBOM Reduces Clicks and Consolidates Warnings
The Save Item dialog in the SolidWorks OpenBOM add-in now requires fewer clicks and supports part number generation and multiselect for items.
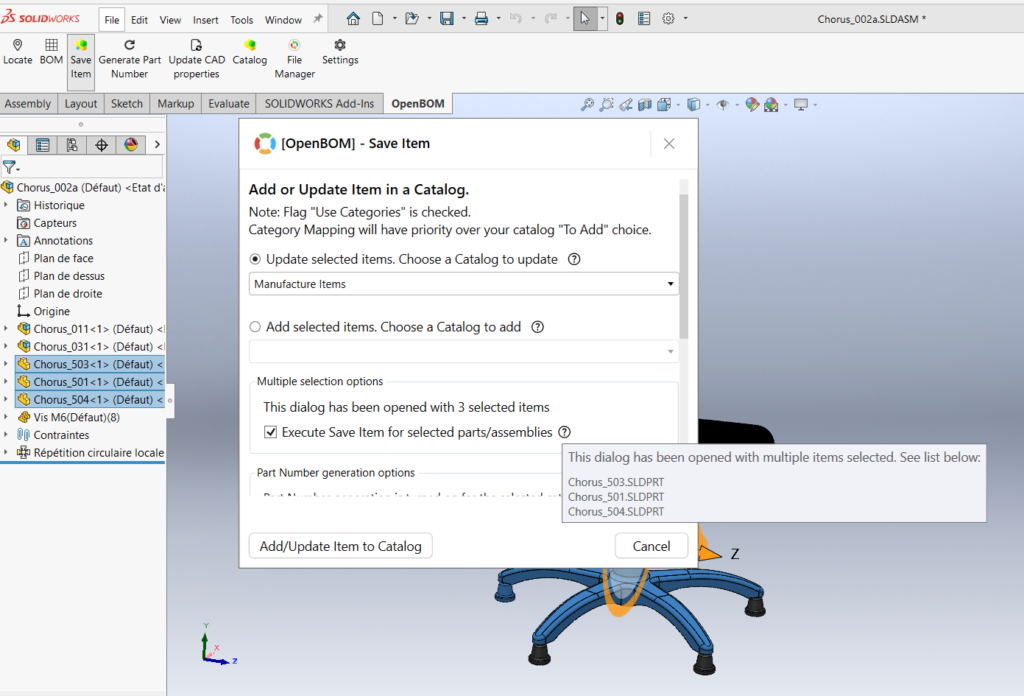
How It Works
- Open any Assembly
- Select some items in the feature tree
- Click Save Item
- You can generate PN and Save items in 1 operation
File Manager: Automatic Drawing Detection in Dependency Graph
CAD File Manager now supports automatic detection of model drawings for the assembly dependency graph.
A new algorithm will identify and include related drawing files automatically during Smart Sync, so agents and users no longer need to manually specify drawing manifest patterns or select drawing files for the sync scope.
This improvement helps make the dependency graph more complete and reduces manual setup when working with assemblies and their drawings.
How It Works
- Select any SW assembly and perform Smart Sync
- Open the assembly in SW
- Create a drawing for any part
- Save it to the folder where the files are located
- Go to FM and ask AI to perform Smart Sync again
- The drawing file uploads and links to the corresponding part
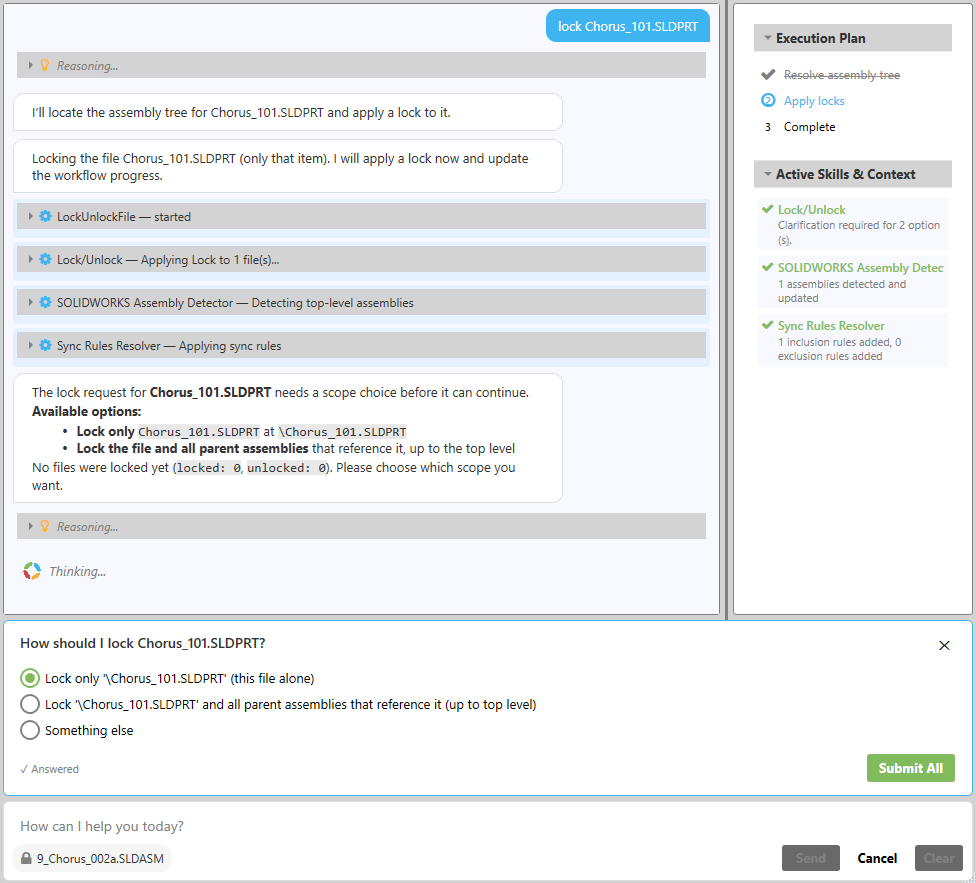
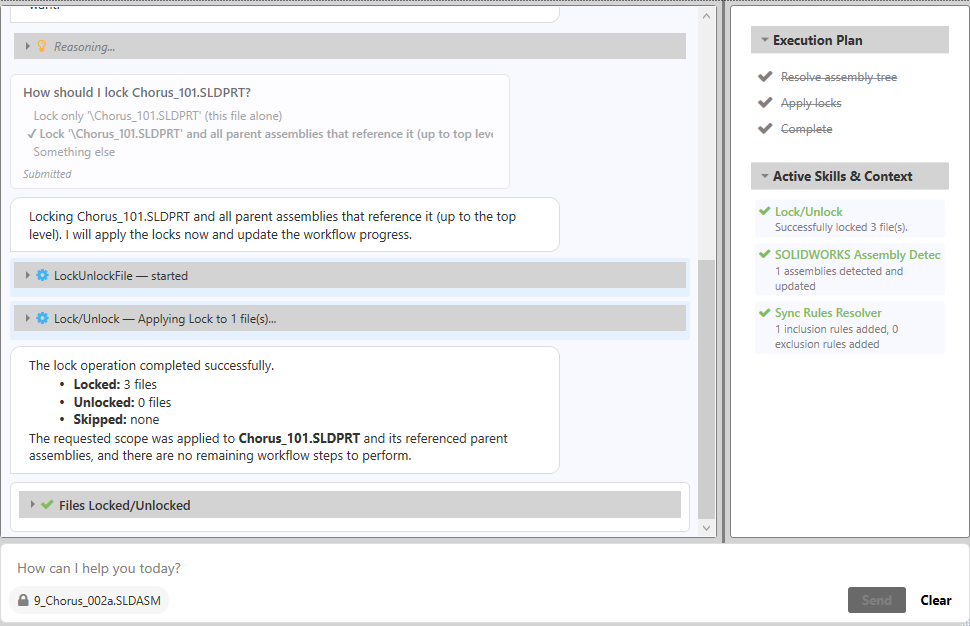
File Manager: Lock Items with Parent Items
CAD File Manager Agentic now provides an enhanced Lock/Unlock experience with a new propagation option.
Users can now choose how locking should be applied: lock only the selected item, lock the entire top-level assembly, or lock the selected item together with its parent items.
This gives users more control over the lock scope and helps manage assembly structures more accurately without manually locking related parent items one by one.
How It Works
- Upload any MLVL assembly via SS
- In AI mode, request to lock any child item
- A new card dialog will appear about the lock’s scope
Fixes and Improvements
This release also includes a set of refinements aimed at improving export accuracy, revision visibility, inventory traceability, currency handling, and ZIP file organization:
- Excel exports with header rows now use values from the selected BOM revision rather than the latest revision.
- CAD Integration Thumbnail Images are bigger. Yes. We know. It took too long.
- Quantity On Hand changes made when an Order is released to production are now recorded in change history, providing clearer inventory traceability.
- Revision-related information now updates immediately across BOMs, Catalogs, Item Revision lists and panels, Dashboard, and approved Change Requests and Change Orders without requiring a manual page refresh.
- Cost values are now displayed consistently when switching between the Items List and Tiles views, including when working with currencies other than the account’s previous default currency.
- Property-based filename suffixes are now applied consistently to linked files associated with the parent BOM, as well as files attached to subassemblies and components inside the exported ZIP archive.
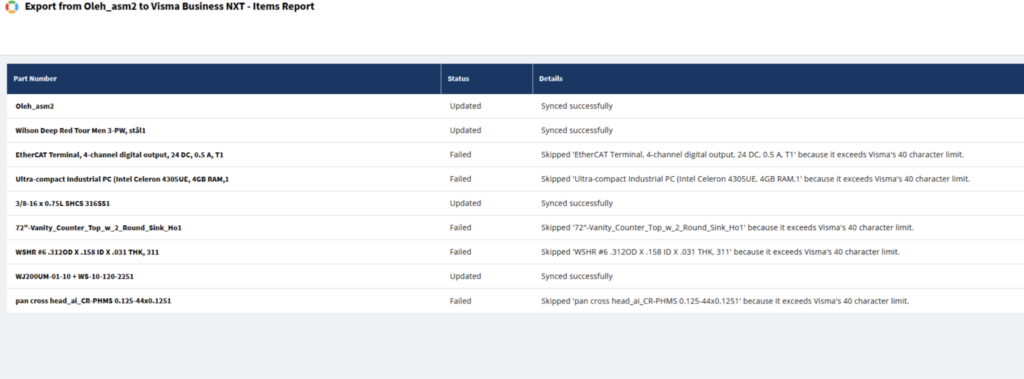
- Improved Visma BOM export by validating Part Number length before synchronization and adding clear ERP report messages for items skipped because they exceed Visma’s supported limit.
Thank you for your support and feedback! REGISTER FOR FREE to check how OpenBOM can help you.
Best, Oleg
Join our newsletter to receive a weekly portion of news, articles, and tips about OpenBOM and our community.